Showing posts with label RMI. Show all posts

Getting Started with Simple Remote EJB 3.X Server Sample

This sample will give you a simple working experience with EJB client server . here I’m using netbeans as IDE and JBoss 5.1 as my EJB Container. and I created seperate client for Stateful an Stateless EJB sessions  in order to make easy the development .We'll create a ejb module project named EJBTestServer.


1. In NetBeans IDE, select ,File > New Project Select project type under category,Java EE, Project type as Ejb Module. Click Next > button. Enter project name as EJBTestServer and location. Click Next > button.


Select Server as JBoss Application Server. Click Finish button.


above step will give the simple skeleton for the ejb project. our next step is to add the beans to ejb so lets create a Session Bean.

Create a sample EJB

To create a simple EJB, we'll use NetBeans "New" wizard. In example below, We'll create a stateless ejb class named NewSessionBean under EJBTestServer  project. Select project EJBTestServer in project explorer window and right click on it. Select, New > Session Bean.


Enter session bean name and package name. Click Finish button. You'll see the following ejb classes created by NetBeans.
  • NewSessionBean - stateless session bean
  • NewSessionBeanLocal - local interface for session bean
I am changing local interface to remote interface as we're going to access our ejb in a console based application. Remote/Local interface are used to expose business methods that an ejb has to implement.

NewSessionBeanLocal is renamed to NewSessionBeanRemote and NewSessionBean implements NewSessionBeanRemote interface.

 NewSessionBeanRemote.java

package org1;

import javax.ejb.Remote;

/**
*
* @author rajjaz
*/
@Remote
public interface NewSessionBeanRemote {
public String display();
public String sayHello(String name);
}


NewSessionBean.java

package org1;

import javax.ejb.Stateless;

/**
*
* @author rajjaz
*/
@Stateless
public class NewSessionBean implements NewSessionBeanRemote {

// Add business logic below. (Right-click in editor and choose
// "Insert Code > Add Business Method")
public String display(){
return "Hello JBoss";
}
public String sayHello(String name){
this.count++;
return "Hello " + name;
}
}


Do the above way to create the bean for the Stateful Session also
  • NewStatefulSessionBean - stateful session bean
  • NewStatefulSessionBeanRemote - local interface for session bean

 NewStatefulSessionBeanRemote.java

package org1;

import javax.ejb.Remote;

/**
*
* @author rajjaz
*/
@Remote
public interface NewStatefulSessionBeanRemote {
void increment();

void decrement();

int getCount();
}

NewStatefulSessionBean.java

package org1;

import javax.ejb.Remote;
import javax.ejb.Stateful;

/**
*
* @author rajjaz
*/
@Stateful
@Remote(NewStatefulSessionBeanRemote.class)
public class NewStatefulSessionBean implements NewStatefulSessionBeanRemote {

// Add business logic below. (Right-click in editor and choose
// "Insert Code > Add Business Method")


private int count = 0;

@Override
public void increment() {
this.count++;
}

@Override
public void decrement() {
this.count--;
}

@Override
public int getCount() {
return this.count;
}
}


Now Right Click on project and click on Clean and Build then you will get the below output

ant -f /home/rajjaz/NetBeansProjects/EJBTestServer -Dnb.internal.action.name=rebuild clean dist
init:
undeploy-clean:
deps-clean:
Deleting directory /home/rajjaz/NetBeansProjects/EJBTestServer/build
Deleting directory /home/rajjaz/NetBeansProjects/EJBTestServer/dist
clean:
init:
deps-jar:
Created dir: /home/rajjaz/NetBeansProjects/EJBTestServer/build/classes
Copying 2 files to /home/rajjaz/NetBeansProjects/EJBTestServer/build/classes/META-INF
Created dir: /home/rajjaz/NetBeansProjects/EJBTestServer/build/empty
Compiling 4 source files to /home/rajjaz/NetBeansProjects/EJBTestServer/build/classes
compile:
library-inclusion-in-archive:
Created dir: /home/rajjaz/NetBeansProjects/EJBTestServer/dist
Building jar: /home/rajjaz/NetBeansProjects/EJBTestServer/dist/EJBTestServer.jar
dist:
BUILD SUCCESSFUL (total time: 0 seconds)


next to that deply the project. if project was successfully deployed you will get the below output

14:33:30,677 INFO  [EJBContainer] STARTED EJB: org1.NewSessionBean ejbName: NewSessionBean
14:33:30,680 INFO [JndiSessionRegistrarBase] Binding the following Entries in Global JNDI:

NewSessionBean/remote - EJB3.x Default Remote Business Interface
NewSessionBean/remote-org1.NewSessionBeanRemote - EJB3.x Remote Business Interface

14:33:30,693 INFO [SessionSpecContainer] Starting jboss.j2ee:jar=EJBTestServer.jar,name=NewStatefulSessionBean,service=EJB3
14:33:30,693 INFO [EJBContainer] STARTED EJB: org1.NewStatefulSessionBean ejbName: NewStatefulSessionBean
14:33:30,697 INFO [JndiSessionRegistrarBase] Binding the following Entries in Global JNDI:

NewStatefulSessionBean/remote - EJB3.x Default Remote Business Interface
NewStatefulSessionBean/remote-org1.NewStatefulSessionBeanRemote - EJB3.x Remote Business Interface

14:33:38,933 WARN [InterceptorsFactory] EJBTHREE-1246: Do not use InterceptorsFactory with a ManagedObjectAdvisor, InterceptorRegistry should be used via the bean container


That's all now our project was successfully deployed on Jboss Server our next step step is create simple client to test this server

Server Source Code

Create a simple Client

Getting Started with Simple RMI services

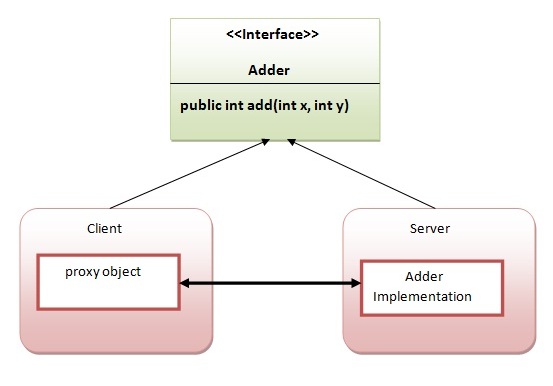
Writing your own RMI services can be a little difficult at first, so we'll start off with an example which isn't too ambitious.In this example, we have followed all the 6 steps to create and run the rmi application. The client application need only two files, remote interface and client application. In the rmi application, both client and server interacts with the remote interface. The client application invokes methods on the
proxy object, RMI sends the request to the remote JVM. The return value is sent back to the proxy object and then to the client application.

The is given the 6 steps to write the RMI program.

1.create the remote interface

An interface is a method which contains abstract methods; these methods must be implemented by another class.For creating the remote interface, extend the Remote interface and declare the RemoteException with all the methods of the remote interface. Here, we are creating a remote interface that extends the Remote interface.

import java.math.BigInteger;
import java.rmi.*;

//
// PowerService Interface
//
// Interface for a RMI service that calculates powers
//
public interface PowerService extends Remote
{
// Calculate the square of a number
public BigInteger square ( int number )
throws RemoteException;

// Calculate the power of a number
public BigInteger power ( int num1, int num2)
throws RemoteException;
}

2) Provide the implementation of the remote interface

Now provide the implementation of the remote interface. For providing the implementation of the Remote interface, we need to
  • Either extend the UnicastRemoteObject class,
  • or use the exportObject() method of the UnicastRemoteObject class
In case, you extend the UnicastRemoteObject class, you must define a constructor that declares RemoteException. Our implementation of the service also needs to have a main method. The main method will be responsible for creating an instance of our PowerServiceServer, and registering (or binding) the service with the RMI Registry. 
Now rmi services need to be hosted in a server process. The Naming class provides methods to get and store the remote object. The Naming class provides 5 methods.

  1. public static java.rmi.Remote lookup(java.lang.String) throws java.rmi.NotBoundException, java.net.MalformedURLException, java.rmi.RemoteException; it returns the reference of the remote object.
  2. public static void bind(java.lang.String, java.rmi.Remote) throws java.rmi.AlreadyBoundException, java.net.MalformedURLException, java.rmi.RemoteException; it binds the remote object with the given name.
  3. public static void unbind(java.lang.String) throws java.rmi.RemoteException, java.rmi.NotBoundException, java.net.MalformedURLException; it destroys the remote object which is bound with the given name.
  4. public static void rebind(java.lang.String, java.rmi.Remote) throws java.rmi.RemoteException, java.net.MalformedURLException; it binds the remote object to the new name.
  5. public static java.lang.String[] list(java.lang.String) throws java.rmi.RemoteException, java.net.MalformedURLException; it returns an array of the names of the remote objects bound in the registry.

import java.math.*;
import java.rmi.*;
import java.rmi.server.*;

//
// PowerServiceServer
//
// Server for a RMI service that calculates powers
//
public class PowerServiceServer extends UnicastRemoteObject
implements PowerService
{
public PowerServiceServer () throws RemoteException
{
super();
}

// Calculate the square of a number
public BigInteger square ( int number )
throws RemoteException
{
String numrep = String.valueOf(number);
BigInteger bi = new BigInteger (numrep);

// Square the number
bi.multiply(bi);

return (bi);
}

// Calculate the power of a number
public BigInteger power ( int num1, int num2)
throws RemoteException
{
String numrep = String.valueOf(num1);
BigInteger bi = new BigInteger (numrep);

bi = bi.pow(num2);

return bi;
}

public static void main ( String args[] ) throws Exception
{
// Create an instance of our power service server ...
PowerServiceServer svr = new PowerServiceServer();

// ... and bind it with the RMI Registry
Naming.bind ("PowerService", svr);

System.out.println ("Service bound....");
}
}


5) Create and run the client application

Writing clients is the easy part - all a client has to do is call the registry to obtain a reference to the remote object, and call its methods. At the client we are getting the stub object by the lookup() method of the Naming class and invoking the method on this object. All the underlying network communication is hidden from view, which makes RMI clients simple. In this example, we are running the server and client applications, You can run the client locally, or from a different machine. In either case, you'll need to specify the hostname of the machine where you are running the server. If you're running it locally, use localhost as the hostname.If you want to access the remote object from another machine, change the localhost to the host name (or IP address) where the remote object is located.

  To identify a service, we specify an RMI URL. The URL contains the hostname on which the service is located, and the logical name of the service. This returns a PowerService instance, which can then be used just like a local object reference. We can call the methods just as if we'd created an instance of the remote PowerServiceServer ourselves.


import java.rmi.*;
import java.rmi.Naming;
import java.io.*;


//
// PowerServiceClient
//

public class PowerServiceClient
{
public static void main(String args[]) throws Exception
{
// Check for hostname argument
if (args.length != 1)
{
System.out.println
("Syntax - PowerServiceClient host");
System.exit(1);
}


// Call registry for PowerService
PowerService service = (PowerService) Naming.lookup
("rmi://" + args[0] + "/PowerService");

DataInputStream din = new
DataInputStream (System.in);

for (;;)
{
System.out.println
("1 - Calculate square");
System.out.println
("2 - Calculate power");
System.out.println
("3 - Exit"); System.out.println();
System.out.print ("Choice : ");

String line = din.readLine();
Integer choice = new Integer(line);

int value = choice.intValue();

switch (value)
{
case 1:
System.out.print ("Number : ");
line = din.readLine();System.out.println();
choice = new Integer (line);
value = choice.intValue();

// Call remote method
System.out.println
("Answer : " + service.square(value));

break;
case 2:
System.out.print ("Number : ");
line = din.readLine();
choice = new Integer (line);
value = choice.intValue();

System.out.print ("Power : ");
line = din.readLine();
choice = new Integer (line);
int power = choice.intValue();

// Call remote method
System.out.println
("Answer : " + service.power(value, power));

break;
case 3:
System.exit(0);
default :
System.out.println ("Invalid option");
break;
}
}
}
}

Steps To Test

1) compile all the java files 

javac *.java  
 
2)create stub and skeleton object by rmic tool 
 
rmic PowerServiceServer 
 
3)start rmi registry in one command prompt 
 
rmiregistry 5000  
 
4)start the server in another command prompt 
 
java PowerServiceServer 
 
5)start the client application in another command prompt 
 
java PowerServiceClient localhost 


Output


References

JAVA Remote Method Invocation (RMI)

Remote method invocation allows applications to call object methods located remotely, sharing resources and processing load across systems. Unlike other systems for remote execution which require that only simple data types or defined structures be passed to and from methods, RMI allows any Java object type to be used - even if the client or server has never encountered it before. RMI allows both client and server to dynamically load new object types as required.

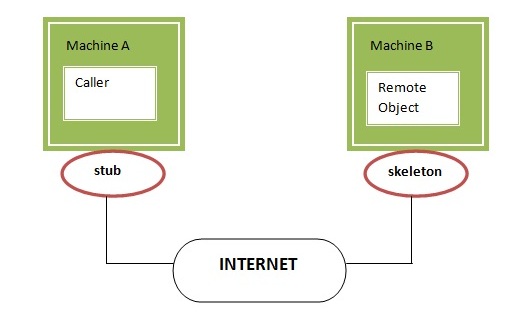
RMI uses stub and skeleton object for communication with the remote object.
A remote object is an object whose method can be invoked from another JVM. JVMs can be located on separate computers - yet one JVM can invoke methods belonging to an object stored in another JVM. Methods can even pass objects that a foreign virtual machine has never encountered before, allowing dynamic loading of new classes as required. This is a powerful feature! Let's understand the stub and skeleton objects:

stub

The stub is an object, acts as a gateway for the client side. All the outgoing requests are routed through it. It resides at the client side and represents the remote object. When the caller invokes method on the stub object, it does the following tasks:
  1. It initiates a connection with remote Virtual Machine (JVM),
  2. It writes and transmits (marshals) the parameters to the remote Virtual Machine (JVM),
  3. It waits for the result
  4. It reads (unmarshals) the return value or exception, and
  5. It finally, returns the value to the caller.

skeleton

The skeleton is an object, acts as a gateway for the server side object. All the incoming requests are routed through it. When the skeleton receives the incoming request, it does the following tasks:
  1. It reads the parameter for the remote method
  2. It invokes the method on the actual remote object, and
  3. It writes and transmits (marshals) the result to the caller.

Consider the follow scenario :
  • Developer A writes a service that performs some useful function. He regularly updates this service, adding new features and improving existing ones.
  • Developer B wishes to use the service provided by Developer A. However, it's inconvenient for A to supply B with an update every time.


Java RMI provides a very easy solution! Since RMI can dynamically load new classes, Developer B can let RMI handle updates automatically for him. Developer A places the new classes in a web directory, where RMI can fetch the new updates as they are required.

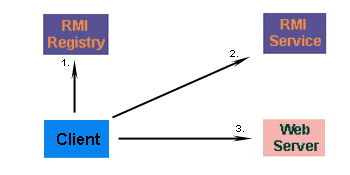
Firstly, the client must contact an RMI registry, and request the name of the service. Developer B won't know the exact location of the RMI service, but he knows enough to contact Developer A's registry. This will point him in the direction of the service he wants to call..

Developer A's service changes regularly, so Developer B doesn't have a copy of the class. Not to worry, because the client automatically fetches the new subclass from a webserver where the two developers share classes. The new class is loaded into memory, and the client is ready to use the new class. This happens transparently for Developer B - no extra code need to be written to fetch the class.

References