Getting Started with Simple RMI services

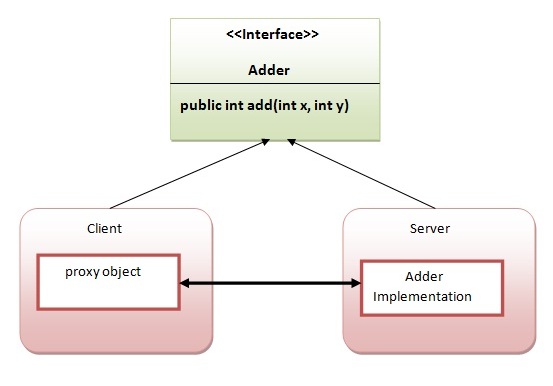
Writing your own RMI services can be a little difficult at first, so we'll start off with an example which isn't too ambitious.In this example, we have followed all the 6 steps to create and run the rmi application. The client application need only two files, remote interface and client application. In the rmi application, both client and server interacts with the remote interface. The client application invokes methods on the
proxy object, RMI sends the request to the remote JVM. The return value is sent back to the proxy object and then to the client application.

The is given the 6 steps to write the RMI program.

1.create the remote interface

An interface is a method which contains abstract methods; these methods must be implemented by another class.For creating the remote interface, extend the Remote interface and declare the RemoteException with all the methods of the remote interface. Here, we are creating a remote interface that extends the Remote interface.

import java.math.BigInteger;
import java.rmi.*;

//
// PowerService Interface
//
// Interface for a RMI service that calculates powers
//
public interface PowerService extends Remote
{
// Calculate the square of a number
public BigInteger square ( int number )
throws RemoteException;

// Calculate the power of a number
public BigInteger power ( int num1, int num2)
throws RemoteException;
}

2) Provide the implementation of the remote interface

Now provide the implementation of the remote interface. For providing the implementation of the Remote interface, we need to
  • Either extend the UnicastRemoteObject class,
  • or use the exportObject() method of the UnicastRemoteObject class
In case, you extend the UnicastRemoteObject class, you must define a constructor that declares RemoteException. Our implementation of the service also needs to have a main method. The main method will be responsible for creating an instance of our PowerServiceServer, and registering (or binding) the service with the RMI Registry. 
Now rmi services need to be hosted in a server process. The Naming class provides methods to get and store the remote object. The Naming class provides 5 methods.

  1. public static java.rmi.Remote lookup(java.lang.String) throws java.rmi.NotBoundException, java.net.MalformedURLException, java.rmi.RemoteException; it returns the reference of the remote object.
  2. public static void bind(java.lang.String, java.rmi.Remote) throws java.rmi.AlreadyBoundException, java.net.MalformedURLException, java.rmi.RemoteException; it binds the remote object with the given name.
  3. public static void unbind(java.lang.String) throws java.rmi.RemoteException, java.rmi.NotBoundException, java.net.MalformedURLException; it destroys the remote object which is bound with the given name.
  4. public static void rebind(java.lang.String, java.rmi.Remote) throws java.rmi.RemoteException, java.net.MalformedURLException; it binds the remote object to the new name.
  5. public static java.lang.String[] list(java.lang.String) throws java.rmi.RemoteException, java.net.MalformedURLException; it returns an array of the names of the remote objects bound in the registry.

import java.math.*;
import java.rmi.*;
import java.rmi.server.*;

//
// PowerServiceServer
//
// Server for a RMI service that calculates powers
//
public class PowerServiceServer extends UnicastRemoteObject
implements PowerService
{
public PowerServiceServer () throws RemoteException
{
super();
}

// Calculate the square of a number
public BigInteger square ( int number )
throws RemoteException
{
String numrep = String.valueOf(number);
BigInteger bi = new BigInteger (numrep);

// Square the number
bi.multiply(bi);

return (bi);
}

// Calculate the power of a number
public BigInteger power ( int num1, int num2)
throws RemoteException
{
String numrep = String.valueOf(num1);
BigInteger bi = new BigInteger (numrep);

bi = bi.pow(num2);

return bi;
}

public static void main ( String args[] ) throws Exception
{
// Create an instance of our power service server ...
PowerServiceServer svr = new PowerServiceServer();

// ... and bind it with the RMI Registry
Naming.bind ("PowerService", svr);

System.out.println ("Service bound....");
}
}


5) Create and run the client application

Writing clients is the easy part - all a client has to do is call the registry to obtain a reference to the remote object, and call its methods. At the client we are getting the stub object by the lookup() method of the Naming class and invoking the method on this object. All the underlying network communication is hidden from view, which makes RMI clients simple. In this example, we are running the server and client applications, You can run the client locally, or from a different machine. In either case, you'll need to specify the hostname of the machine where you are running the server. If you're running it locally, use localhost as the hostname.If you want to access the remote object from another machine, change the localhost to the host name (or IP address) where the remote object is located.

  To identify a service, we specify an RMI URL. The URL contains the hostname on which the service is located, and the logical name of the service. This returns a PowerService instance, which can then be used just like a local object reference. We can call the methods just as if we'd created an instance of the remote PowerServiceServer ourselves.


import java.rmi.*;
import java.rmi.Naming;
import java.io.*;


//
// PowerServiceClient
//

public class PowerServiceClient
{
public static void main(String args[]) throws Exception
{
// Check for hostname argument
if (args.length != 1)
{
System.out.println
("Syntax - PowerServiceClient host");
System.exit(1);
}


// Call registry for PowerService
PowerService service = (PowerService) Naming.lookup
("rmi://" + args[0] + "/PowerService");

DataInputStream din = new
DataInputStream (System.in);

for (;;)
{
System.out.println
("1 - Calculate square");
System.out.println
("2 - Calculate power");
System.out.println
("3 - Exit"); System.out.println();
System.out.print ("Choice : ");

String line = din.readLine();
Integer choice = new Integer(line);

int value = choice.intValue();

switch (value)
{
case 1:
System.out.print ("Number : ");
line = din.readLine();System.out.println();
choice = new Integer (line);
value = choice.intValue();

// Call remote method
System.out.println
("Answer : " + service.square(value));

break;
case 2:
System.out.print ("Number : ");
line = din.readLine();
choice = new Integer (line);
value = choice.intValue();

System.out.print ("Power : ");
line = din.readLine();
choice = new Integer (line);
int power = choice.intValue();

// Call remote method
System.out.println
("Answer : " + service.power(value, power));

break;
case 3:
System.exit(0);
default :
System.out.println ("Invalid option");
break;
}
}
}
}

Steps To Test

1) compile all the java files 

javac *.java  
 
2)create stub and skeleton object by rmic tool 
 
rmic PowerServiceServer 
 
3)start rmi registry in one command prompt 
 
rmiregistry 5000  
 
4)start the server in another command prompt 
 
java PowerServiceServer 
 
5)start the client application in another command prompt 
 
java PowerServiceClient localhost 


Output


References

JAVA Remote Method Invocation (RMI)

Remote method invocation allows applications to call object methods located remotely, sharing resources and processing load across systems. Unlike other systems for remote execution which require that only simple data types or defined structures be passed to and from methods, RMI allows any Java object type to be used - even if the client or server has never encountered it before. RMI allows both client and server to dynamically load new object types as required.

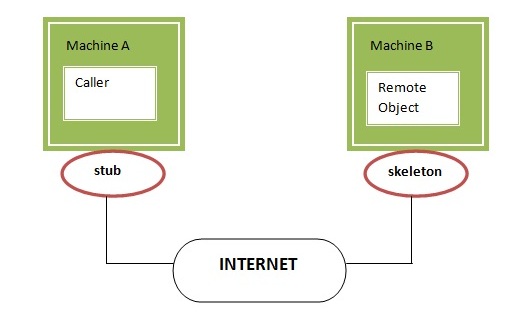
RMI uses stub and skeleton object for communication with the remote object.
A remote object is an object whose method can be invoked from another JVM. JVMs can be located on separate computers - yet one JVM can invoke methods belonging to an object stored in another JVM. Methods can even pass objects that a foreign virtual machine has never encountered before, allowing dynamic loading of new classes as required. This is a powerful feature! Let's understand the stub and skeleton objects:

stub

The stub is an object, acts as a gateway for the client side. All the outgoing requests are routed through it. It resides at the client side and represents the remote object. When the caller invokes method on the stub object, it does the following tasks:
  1. It initiates a connection with remote Virtual Machine (JVM),
  2. It writes and transmits (marshals) the parameters to the remote Virtual Machine (JVM),
  3. It waits for the result
  4. It reads (unmarshals) the return value or exception, and
  5. It finally, returns the value to the caller.

skeleton

The skeleton is an object, acts as a gateway for the server side object. All the incoming requests are routed through it. When the skeleton receives the incoming request, it does the following tasks:
  1. It reads the parameter for the remote method
  2. It invokes the method on the actual remote object, and
  3. It writes and transmits (marshals) the result to the caller.

Consider the follow scenario :
  • Developer A writes a service that performs some useful function. He regularly updates this service, adding new features and improving existing ones.
  • Developer B wishes to use the service provided by Developer A. However, it's inconvenient for A to supply B with an update every time.


Java RMI provides a very easy solution! Since RMI can dynamically load new classes, Developer B can let RMI handle updates automatically for him. Developer A places the new classes in a web directory, where RMI can fetch the new updates as they are required.

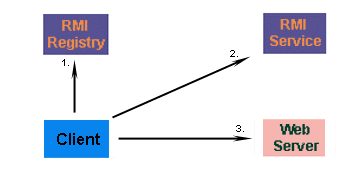
Firstly, the client must contact an RMI registry, and request the name of the service. Developer B won't know the exact location of the RMI service, but he knows enough to contact Developer A's registry. This will point him in the direction of the service he wants to call..

Developer A's service changes regularly, so Developer B doesn't have a copy of the class. Not to worry, because the client automatically fetches the new subclass from a webserver where the two developers share classes. The new class is loaded into memory, and the client is ready to use the new class. This happens transparently for Developer B - no extra code need to be written to fetch the class.

References

Study About Enterprise Java Beans (EJB) Introduction

Enterprise Java Beans (EJB) is a development architecture for building highly scalable and robust enterprise level applications to be deployed on J2EE compliant Application Server such as JBOSS, Web Logic etc.

A recent study by Java developer Raghu Kodali has shown that porting Sun's Java EE tutorial application RosterApp from EJB 2.1 to EJB 3.0 resulted in
more than a 50-percent reduction in code and The development of EJB 3 is faster than EJB 2 because of simplicity and annotations such as @EJB, @Stateless, @Stateful, @ModelDriven, @PreDestroy, @PostConstruct etc.

An EJB application can be deployed on any of the application server such as Jboss, Glassfish, Weblogic, Websphere etc compliant with J2EE 1.3 standard specification.It performs:
  • life cycle management,
  • security,
  • transaction management, and
  • object pooling.
EJB are primarily of three types which are briefly described below:

TypeDescription
Session BeanSession bean contains business logic that can be invoked by local, remote or web service client. It can be stateful or stateless. It is less resource intensive as compared to entity beans. Session bean gets destroyed as soon as user session terminates.
Entity BeanEntity beans represents persistent data storage. User data can be saved to database via entity beans and later on can be retrieved from the database in the entity bean.It is deprecated. Now, it is replaced with JPA (Java Persistent API).
Message Driven BeanMessage driven beans are used in context of JMS (Java Messaging Service). Message Driven Beans can consumes JMS messages from external entities and act accordingly.


References

WSO2 ESB Mediator

Mediators provide an easy way of extending the ESB functionalities. WSO2 ESB is based on the WSO2 Carbon platform, which uses OSGI as the underlying technology. It implies everything that runs inside the WSO2 ESB to be OSGI bundles.


There are two ways of writing the ESB mediator:
When adding a mediator to a sequence, you can configure the mediator in design view or in source view, which allows you to edit the source XML (different mediators have their own XML configurations).

The message content is accessed by some mediators in some mediation scenarios while it is not accessed in the other scenarios. Mediators can be classified as follows based on this aspect.
  • Content-aware mediators: These mediators always access the message content when mediating messages (e.g., Enrich mediator).
  • Content-unaware mediators: These mediators never access the message content when mediating messages (e.g., Send mediator).
  • Conditionally content-aware mediators: These mediators could be either content-aware or content-unaware depending on their exact instance configuration. For an example a simple Log Mediator instance (i.e. configured as <log/>) is content-unaware. However a log mediator configured as <log level=”full”/> would be content-aware since it is expected to log the message payload.

    Mediators are considered to be one of the main mechanisms for extending an ESB. You can write a custom mediator and add it to the ESB. This custom mediator and any other built-in mediator will be exactly the same as the API and the privileges.
    The standard mediators in WSO2 ESB are listed in the table below. Click a link for details on that mediator. There are also many samples that demonstrate how to use mediators.

    The Mediator Catalog

    Category
    Name
    Description
    CoreCallInvoke a service in non blocking synchronous manner
    EnqueueUses a priority executor to ensure high-priority messages are not dropped
    SendSends a message
    LoopbackMoves the message from the In flow to the Out flow, skipping all remaining configuration in the In flow
    SequenceInserts a reference to a sequence
    RespondStops processing on the message and sends it back to the client
    EventSends event notifications to an event source, publishes messages to predefined topics
    DropDrops a message
    Call TemplateConstructs a sequence by passing values into a sequence template
    EnrichEnriches a message
    PropertySets or remove properties associated with the message
    LogLogs a message
    FilterFilterFilters a message using XPath, if-else kind of logic
    OutApplies to messages that are in the Out path of the ESB
    InApplies to messages that are in the In path of the ESB
    ValidateValidates XML messages against a specified schema.
    SwitchFilters messages using XPath, switch logic
    RouterRoutes messages based on XPath filtering
    Conditional RouterImplements complex routing rules (Header based routing, content based routing and other rules)
    TransformXSLTPerforms XSLT transformations on the XML payload
    FastXSLTPerforms XSLT transformations on the message stream
    URLRewriteModifies and rewrites URLs or URL fragments
    XQueryPerforms XQuery transformation
    HeaderSets or removes SOAP headers
    Fault (also called Makefault)Create SOAP Faults
    PayloadFactoryTransforms or replaces message content in between the client and the backend server
    AdvancedCacheEvaluates messages based on whether the same message came to the ESB
    ForEachSplits a message into a number of different messages by finding matching elements in an XPath expression of the original message.
    CloneClones a message
    StoreStores messages in a predefined message store
    IterateSplits a message
    AggregateCombines a message
    CalloutBlocks web services calls
    TransactionExecutes a set of mediators transactionally
    ThrottleLimits the number of messages
    DBReportWrites data to database
    DBLookupRetrieves information from database
    EJBCalls an external Enterprise JavaBean(EJB) and stores the result in the message payload or in a message context property.
    RuleExecutes rules
    EntitlementEvaluates user actions against a XACML policy
    OAuth2-legged OAuth support
    SmooksUsed to apply lightweight transformations on messages in an efficient manner.
    ExtensionBeanManipulates JavaBeans
    ClassCreates and executes a custom mediator
    POJOCommandExecutes a custom command
    ScriptExecutes a mediator written in Scripting language
    SpringCreates a mediator managed by Spring
    AgentBAMCaptures data events and sends them to the BAM server


    References

    WSO2 ESB Feed Inbound Endpoint

    Atom 1.0

    Atom is the name of an XML-based Web content and metadata syndication format, and an application-level protocol for publishing and editing Web resources belonging to periodically updated websites. All Atom feeds must be well-formed XML documents, and are identified with the application/atom+xml media type.
    General considerations:
    • All elements described in Atom must be in the http://www.w3.org/2005/Atom namespace.
    • All timestamps in Atom must conform to RFC 3339.
    • Unless otherwise specified, all values must be plain text (i.e., no entity-encoded html).

    Sample Atom Feed

     
    <?xml version="1.0" encoding="utf-8"?>
    <feed xmlns="http://www.w3.org/2005/Atom">
    <title>Example Feed</title>
    <subtitle>Insert witty or insightful remark here</subtitle>
    <link href="http://example.org/"/>
    <updated>2003-12-13T18:30:02Z</updated>
    <author>
    <name>WSO@ Inc</name>
    <email>WSO@@wso2.com</email>
    </author>
    <id>urn:uuid:60a76c80-d399-11d9-b93C-0003939e0af6</id>
    <entry>
    <title>Atom-Powered Robots Run Amok</title>
    <link href="http://example.org/2003/12/13/atom03"/>
    <id>urn:uuid:1225c695-cfb8-4ebb-aaaa-80da344efa6a</id>
    <updated>2003-12-13T18:30:02Z</updated>
    <summary>Some text.</summary>
    </entry>

    </feed>

    RSS 2.0

    RSS is a Web content syndication format. Its name is an acronym for Really Simple Syndication. RSS is dialect of XML. All RSS files must conform to the XML 1.0 specification, as published on the World Wide Web Consortium (W3C) website.At the top level, a RSS document is a <rss> element, with a mandatory attribute called version, that specifies the version of RSS that the document conforms to. If it conforms to this specification, the version attribute must be 2.0. Subordinate to the <rss> element is a single <channel> element, which contains information about the channel (metadata) and its contents.

    Sample RSS Feed

    <?xml version="1.0" encoding="utf-8"?>
    <rss version="2.0">
    <channel>
    <title>Example Feed</title>
    <description>Insert witty or insightful remark here</description>
    <link>http://example.org/</link>
    <lastBuildDate>Sat, 02 AUG 2015 18:30:02 GMT</lastBuildDate>
    <managingEditor>WSO2@wso2.com (WSO@ Inc)</managingEditor>
    <item>
    <title>Atom-Powered Robots Run Amok</title>
    <link>http://example.org/2003/12/13/atom03</link>
    <guid isPermaLink="false">urn:uuid:1225c695-cfb8-4ebb-aaaa-80da344efa6a</guid>
    <pubDate>Sat, 02 AUG 2015 18:30:02 GMT</pubDate>
    <description>Some text.</description>
    </item>
    </channel>
    </rss>


    What is Feed Inbound

    WSo2 Feed Inbound Developed Based on Apache Abdera   to Consume the Feeds. and inbound filter the feed and its allow only selected Elements of Feed into ESB. We can Configure the time interval to check to new feed updates after it will update to ESB if any new feed Update in given site. for the input URL Atom or RSS but out output will be in Atom format because Atom is the well structured format.

    Feed Inbound Sample Configuration

    Feed Inbound Configuration


    <inboundEndpoint class="org.wso2.carbon.inbound.feedep.FeedEP"
    name="feed" onError="Fault" sequence="TestIn" suspend="false">
    <parameters>
    <parameter name="feed.type">Atom</parameter>
    <parameter name="interval">10000</parameter>
    <parameter name="feed.url">http://news.google.co.in/news?cf=all&amp;hl=en&amp;pz=1&amp;ned=in&amp;output=atom</parameter>
    </parameters>
    </inboundEndpoint>

    Feed Inbound Sample Output

    Feed Inbound Output


    <feed xmlns="http://www.w3.org/2005/Atom">
    <entry>
    <title type="text">Wso2 ESB Feed Inbound Test Title</title>
    <updated>2015-08-31T16:29:00.000Z</updated>
    <content type="text">Feed Inbound Testing
    <link rel="self" href="/feed" />
    <author>
    <name>WSO Inc</name>
    </author>
    <id>urn:uuid:60a76c80-d399-11d9-b93C-0003939e0af6</id>
    </content>
    </entry>
    </feed>


    Elements of <feed>

    A Feed consists of some meta data, followed by any number of entries.

    Required feed elements
    Here’s a list of the required feed elements, each with a brief description, and an example.

    Element
    Description
    idIdentifies the feed using a universally unique and permanent URI. If you have a long-term, renewable lease on your Internet domain name, then you can feel free to use your website’s address.
    titleContains a human readable title for the feed. Often the same as the title of the associated website. This value should not be blank.
    <title>Example, Inc.</title>
    updatedIndicates the last time the feed was modified in a significant way.
    <updated>2003-12-13T18:30:02Z</updated>
    Recommended feed elements
    Atom makes a number of additional requirements and recommendations for feed elements that you should to be aware of. They are as follows:

    content  :  Contains or links to the complete content of the entry. Content must be provided if there is no alternate link, and should be provided if there is no summary. More info here.
               <content>complete story here</content>

    author : Names one author of the entry. An entry may have multiple authors. An entry must contain at least one author element unless there is an author element in the enclosing feed, or there is an author element in the enclosed source element. More info here.
                <author>
                   <name>WSO2 Inc</name>
                </author>

    link : Identifies a related Web page. The type of relation is defined by the rel attribute. An entry is limited to one alternate per type and hreflang. An entry must contain an alternate link if there is no content element. More info here.
                    <link rel="alternate" href="/feed/1234"/>

    WSO2 ESB Feed Connector

    Atom is the name of an XML-based Web content and metadata syndication format, and an application-level protocol for publishing and editing Web resources belonging to periodically updated websites. All Atom feeds must be well-formed XML documents, and are identified with the application/atom+xml media type.

    To use the Feed Connector first we need to configure the Server on Backend to receive the requests from connector. (sample sever implementation Here ). for more Details.

    Create New Feed

    create new Feed Entry will handle by CreateFeed Operation


    <feed.CreateFeed>
    <HostAddress>{$ctx:HostAddress}</HostAddress>
    <Title>{$ctx:Title}</Title>
    <Content>{$ctx:Content}</Content>
    <Author>{$ctx:Author}</Author>
    <FeedID>{$ctx:FeedID}</FeedID>
    </feed.CreateFeed>

    Properties

    • HostAddress: URL of the Service (eg: http://localhost:9002/FeedConnector)
    • Title: Title of the feed we are creating.(eg: This is the title )
    • Content:Feed content or summery (eg: Hello World)
    • Author:owner of the feed (eg: Rajjaz)
    • FeedID:unique ID of the Feed (optional in most feed services server will handle this eg: WSO2Inc:Rajjaz,Feed)


    Edit Feed

    Editing the Existing Feeds by ID handle by EditFeed Operation

    <feed.EditFeed>
    <HostAddress>{$ctx:HostAddress}</HostAddress>
    <Title>{$ctx:NewTitle}</Title>
    <EntryID>{$ctx:EntryID}</EntryID>
    <Content>{$ctx:Content}</Content>
    <Author>{$ctx:Author}</Author>
    <FeedID>{$ctx:FeedID}</FeedID>
    </feed.EditFeed> 

    Properties

    • HostAddress: URL of the Service (eg: http://localhost:9002/FeedConnector)
    • EntryID:Unique ID of Feed by the Feed Server
    • Title:Title of the feed we are creating.(eg: This is the New title )
    • Content:  Feed content or summery (eg: New Hello World)
    • Author: owner of the feed (eg: Rajjaz)
    • FeedID: unique ID of the Feed server (optional in most feed services server will handle this eg: WSO2Inc:Rajjaz,Feed)

    Delete Feed

    Delete the existing feed by id handle by DeleteFeed Operation


    <feed.DeleteFeed>
    <HostAddress>{$ctx:HostAddress}</HostAddress>
    <EntryID>{$ctx:EntryID}</EntryID>
    </feed.DeleteFeed>

    Properties

    • HostAddress: URL of the Service (eg: http://localhost:9002/FeedConnector).
    • EntryID: Unique ID of Feed by the Feed Server.

      Sample configuration

      Following is a sample proxy service that illustrates how to connect to feed conector with the CreateFeedoperation.


      <?xml version="1.0" encoding="UTF-8"?>
      <proxy xmlns="http://ws.apache.org/ns/synapse" name="Feed_CreateEnttry" transports="https"
      statistics="disable" trace="disable" startOnLoad="true">
      <target>
      <inSequence onError="faultHandlerSeq">
      <property name="HostAddress" expression="//HostAddress/text()" />
      <property name="Title" expression="//Title/text()" />
      <property name="Content" expression="//Content/text()" />
      <property name="Author" expression="//Author/text()" />
      <property name="FeedID" expression="//FeedID/text()"/>
      <feed.CreateFeed>
      <HostAddress>{$ctx:HostAddress}</HostAddress>
      <Title>{$ctx:Title}</Title>
      <Content>{$ctx:Content}</Content>
      <Author>{$ctx:Author}</Author>
      <FeedID>{$ctx:FeedID}</FeedID>
      </feed.CreateFeed>
      <respond />
      </inSequence>
      <outSequence>
      <send />
      </outSequence>
      </target>
      <description />
      </proxy>

      Getting Started with Simple Apache Abdera Server

      Apache Abdera provides an implementation of the IETF Atom Syndication Format and Atom Publishing Protocol standards (RFC's 4287 and 5023). In this blog we're going to walk through how to build an Atom Publishing Protocol service server sample using Abdera's concepts of Providers and Collection Adapters. If you remember your AtomPub basics, you'll recall that AtomPub services are organized in a hierarchical way such that we have:

      • Services - A grouping of Workspaces
      • Workspace - A grouping of Collections
      • Collections - An Atom Feed which contains Atom entries. Entries can be created, deleted, updated, etc through the HTTP methods and the mapping that AtomPub defines.

        Let's start to build a simple Abdera server sample for our Testing. So create a simple java project in your IDE and add below dependencies in your pom file to provide server function and abdera libraries.

        pom.xml

        <project xmlns="http://maven.apache.org/POM/4.0.0" xmlns:xsi="http://www.w3.org/2001/XMLSchema-instance"
        xsi:schemaLocation="http://maven.apache.org/POM/4.0.0 http://maven.apache.org/xsd/maven-4.0.0.xsd">
        <modelVersion>4.0.0</modelVersion>

        <groupId>com.atomfeed.connector</groupId>
        <artifactId>ATOMPubServer</artifactId>
        <version>1.0.0</version>
        <packaging>jar</packaging>

        <name>ATOMPubServer</name>
        <url>http://maven.apache.org</url>

        <properties>
        <project.build.sourceEncoding>UTF-8</project.build.sourceEncoding>
        </properties>

        <dependencies>
        <dependency>
        <groupId>junit</groupId>
        <artifactId>junit</artifactId>
        <version>3.8.1</version>
        <scope>test</scope>
        </dependency>
        <dependency>
        <groupId>org.mortbay.jetty</groupId>
        <artifactId>jetty-maven-plugin</artifactId>
        <version>7.4.5.v20110725</version>
        </dependency>
        <dependency>
        <groupId>org.apache.abdera</groupId>
        <artifactId>abdera-server</artifactId>
        <version>1.1.2</version>
        </dependency>
        </dependencies>
        </project>


        Let's begin our code with the setting up the URL Space since we are using jetty server for our sample we need to initialize the sever and service url for our service which we are creating.


        In this code we're setting up a Provider which contains an Atom workspace which contains our Atom collection.
        When we initialize our CollectionAdapter we call setHref. Abdera uses this to determine the URL space

        App.java


        package com.atomfeed.connector.server;

        import org.apache.abdera.protocol.server.Provider;
        import org.apache.abdera.protocol.server.impl.DefaultProvider;
        import org.apache.abdera.protocol.server.impl.SimpleWorkspaceInfo;
        import org.apache.abdera.protocol.server.servlet.AbderaServlet;
        import org.eclipse.jetty.server.Server;
        import org.eclipse.jetty.servlet.ServletContextHandler;
        import org.eclipse.jetty.servlet.ServletHolder;

        import java.io.IOException;
        import javax.servlet.ServletException;
        import javax.servlet.http.HttpServletRequest;
        import javax.servlet.http.HttpServletResponse;

        public class App {

        public static void main(String... args) throws Exception {
        int port = 9002;
        try {
        port = args.length > 0 ? Integer.parseInt(args[0]) : 9002;
        } catch (Exception e) {
        }
        Server server = new Server(port);
        ServletContextHandler context = new ServletContextHandler(server, "/", ServletContextHandler.SESSIONS);
        ServletHolder servletHolder = new ServletHolder(new EmployeeProviderServlet());
        context.addServlet(servletHolder, "/*");
        server.start();
        server.join();
        }

        public static final class EmployeeProviderServlet extends AbderaServlet {
        @Override
        protected Provider createProvider() {
        EmployeeCollectionAdapter ca = new EmployeeCollectionAdapter();
        ca.setHref("FeedConnector");

        SimpleWorkspaceInfo wi = new SimpleWorkspaceInfo();
        wi.setTitle("Feed Update");
        wi.addCollection(ca);

        DefaultProvider provider = new DefaultProvider("/");
        provider.addWorkspace(wi);

        provider.init(getAbdera(), null);
        return provider;
        }

        @Override
        protected void service(HttpServletRequest request, HttpServletResponse response) throws ServletException, IOException {

        super.service(request, response);
        }

        }
        }


        Abdera comes with a class called the AbstractEntityCollectionAdapter. This class provides a simple "fill in the blanks" approach so that you can easily map your concepts to an AtomPub collection. The idea is that you have an entity class which represents each individual entry. For instance, if you were writing a blog, you would have a BlogEntry class which backs the entry. Or in our case of an employee directory, it would be an Employee class. Abdera will then provide some template methods which you fill in to give Abdera the necessary metadata.
        Our Atom Collection is going to be a simple store of employees which can be added to, deleted from, updated, etc. To get started, we must first build our Employee class:
        package com.atomfeed.connector.server;

        import java.util.Date;


        public class Employee {
        private int id;
        private String Content;
        private String title;
        private Date updated;

        public int getId() {
        return id;
        }

        public void setId(int id) {
        this.id = id;
        }

        public String getContent() {
        return Content;
        }

        public void setContent(String Content) {
        this.Content = Content;
        }

        public Date getUpdated() {
        return updated;
        }

        public void setUpdated(Date updated) {
        this.updated = updated;
        }

        public void settitle(String title) {
        this.title = title;
        }

        public String gettitle() {

        return title;
        }
        }

        The ID is going to be used as a unique identifier for our Employee so that even if the employee's name changes, we can tie it to a previous atom entry and track the changes. The updated date will be used for our Atom feed, so that consumers know if there were changes and when they occurred. when we check the last updated date this is the information we are going to check to receive the last updated news feeds.

        The first thing we'll do is provide a hashmap to store our Employees in. Typically this will be a database or some other type of backend store. To keep things simple, we're going to store employees in a Map according to their employee id.
        Next up, we need to implement some methods which provide some basic metadata about our collection such as the feed author, the feed ID, and the feed title:
        The ID in getId(RequestContext) must be a unique identifier for your feed. The idea is that even if your feed location changes, or someone is redistributing your feed, the feed reader can use this ID to identify that two feeds are the exact same. For information on how to construct feed IDs and why they matter, its recommend that you use this article on how to create feed ids.
        Walking through this we have:
        • getId: this ID will uniquely identify your entry. It follows the same rules as the feed ID.
        • getTitle: The title of this entry.
        • getUpdated: The time this entry was last updated.
        • getAuthors: the author of this entry. It is ok to leave this empty provided that there is an author supplied for the feed.
        • getContent: The actual content of this entry that will be displayed in the feed. In this case it is just the employee name. You can return a Content or String object from this method. Using the Content object allows you to have control over whether or not the content is rendered as HTML. Alternatively you could provider a summary by overriding getSummary. You must have at least one of the getContent or getSummary methods not return null.

          Mapping Entries to Resources

          The AbstractEntityCollectionAdapter maps individual entries via a "resource name." You must provide a way to create a resource name for your entry and also provide a way to look up an entry from your resource name. In this case, our entry is an Employee.

          When we do this we must ensure that we won't have conflicts. Which means we don't want to use the employee name as the unique resource name as there may be conflicts. However we don't necessarily want to use just the employee ID either as the URL isn't very friendly. So we'll create a hybrid of the form: "EMPLOYEE_ID-EMPLOYEE_NAME".


           Note the use of the sanitizer. This will take any invalid characters for a URL and either strip or replace them from the string.
          The POST method corresponds to creating an Employee in the database. Here we're:
          • Creating a new Employee object
          • Creating a new id for it
          • Setting the name of the Employee from the Content. In a more advanced case, you woudl want to store the Employee information in an XML structure or an HTML microformat.
          • Store the Employee in our HashMap.

            The putEntry method is similar. In this case we're just updating the employee name.

            Finally, we have the deleteEntry method which gives us the resource name and allows us to remove it from the Map.

            package com.atomfeed.connector.server;

            import java.util.Arrays;
            import java.util.Date;
            import java.util.HashMap;
            import java.util.List;
            import java.util.Map;
            import java.util.concurrent.atomic.AtomicInteger;

            import org.apache.abdera.Abdera;
            import org.apache.abdera.factory.Factory;
            import org.apache.abdera.i18n.iri.IRI;
            import org.apache.abdera.model.Content;
            import org.apache.abdera.model.Person;
            import org.apache.abdera.protocol.server.RequestContext;
            import org.apache.abdera.protocol.server.context.ResponseContextException;
            import org.apache.abdera.protocol.server.impl.AbstractEntityCollectionAdapter;


            public class EmployeeCollectionAdapter extends AbstractEntityCollectionAdapter<Employee> {
            private static final String ID_PREFIX = "tag:wso2.com,2015,feed:entry:";

            private AtomicInteger nextId = new AtomicInteger(1000);
            private Map<Integer, Employee> employees = new HashMap<Integer, Employee>();
            private Factory factory = new Abdera().getFactory();

            @Override
            public String getId(RequestContext request) {
            return "tag:wso2.com,2015,feed:entry:";
            }

            public String getTitle(RequestContext request) {
            return "Feed Connector feeds";
            }

            @Override
            public String getAuthor(RequestContext request) {
            return "WSO2 Inc";
            }

            @Override
            public Iterable<Employee> getEntries(RequestContext request) {
            return employees.values();
            }

            @Override
            public Employee getEntry(String resourceName, RequestContext request) throws ResponseContextException {
            Integer id = getIdFromResourceName(resourceName);
            return employees.get(id);
            }

            private Integer getIdFromResourceName(String resourceName) throws ResponseContextException {
            int idx = resourceName.indexOf("-");
            if (idx == -1) {
            throw new ResponseContextException(404);
            }
            return new Integer(resourceName.substring(0, idx));
            }

            @Override
            public String getName(Employee entry) {
            return entry.getId() + "-" + entry.gettitle().replaceAll(" ", "_");
            }

            @Override
            public String getId(Employee entry) {
            return ID_PREFIX + entry.getId();
            }

            @Override
            public String getTitle(Employee entry) {
            return entry.gettitle();
            }

            @Override
            public Date getUpdated(Employee entry) {
            return entry.getUpdated();
            }

            @Override
            public List<Person> getAuthors(Employee entry, RequestContext request) throws ResponseContextException {
            Person author = request.getAbdera().getFactory().newAuthor();
            author.setName("WOS2 Inc");
            return Arrays.asList(author);
            }

            @Override
            public Object getContent(Employee entry, RequestContext request) {
            Content content = factory.newContent(Content.Type.TEXT);
            content.setText(entry.gettitle());
            return content;
            }

            @Override
            public Employee postEntry(String title,
            IRI id,
            String summary,
            Date updated,
            List<Person> authors,
            Content content,
            RequestContext request) throws ResponseContextException {
            Employee employee = new Employee();
            employee.setContent(content.getText().trim());
            employee.setId(nextId.getAndIncrement());
            employee.settitle(title);
            employee.setUpdated(updated);
            employees.put(employee.getId(), employee);

            return employee;
            }

            @Override
            public void putEntry(Employee employee,
            String title,
            Date updated,
            List<Person> authors,
            String summary,
            Content content,
            RequestContext request) throws ResponseContextException {
            employee.settitle(content.getText().trim());
            }

            @Override
            public void deleteEntry(String resourceName, RequestContext request) throws ResponseContextException {
            Integer id = getIdFromResourceName(resourceName);
            employees.remove(id);
            }
            }


            After complete  the development just run the application as java application you will see the console output as


            2015-10-19 11:33:16.825:INFO::jetty-7.4.5.v20110725
            2015-10-19 11:33:16.862:INFO::started o.e.j.s.ServletContextHandler{/,null}
            2015-10-19 11:33:16.985:INFO::Started SelectChannelConnector@0.0.0.0:9002 STARTING


            Later we can check the the output for this server after build a client for this sever now you can download full source code and can contribute for the further development of this Source Code

            References